The Visitron VisiScope Spinning Disk Confocal Microscope has 4 laser lines (405, 488, 561 and 640 nm), and 6 objectives (4x/0.13, 10x/0.3, 20x/0.45, 40x/0.6, 60x/1.42 OIL and 100x/1.45 OIL). Detection is based on Andor Zyla 4.2 PLUS camera.
High speed confocal imaging, simultaneous 2 color detection (currently unavailable) and sequential multichannel acquisition.
Scale information / image sizes at binning 1:
| Obj | um/image | um/pixel | |
|---|---|---|---|
| 4x | 3330 | 1.626 | |
| 10x | 1332 | 0.650 | |
| 20x | 666 | 0.325 | |
| 40x | 333 | 0.163 | |
| 60x | 222 | 0.108 | |
| 100x | 133 | 0.065 |
Motorized stage functions for automatic imaging on multiple positions are available.
Switch On
Turn on the PC
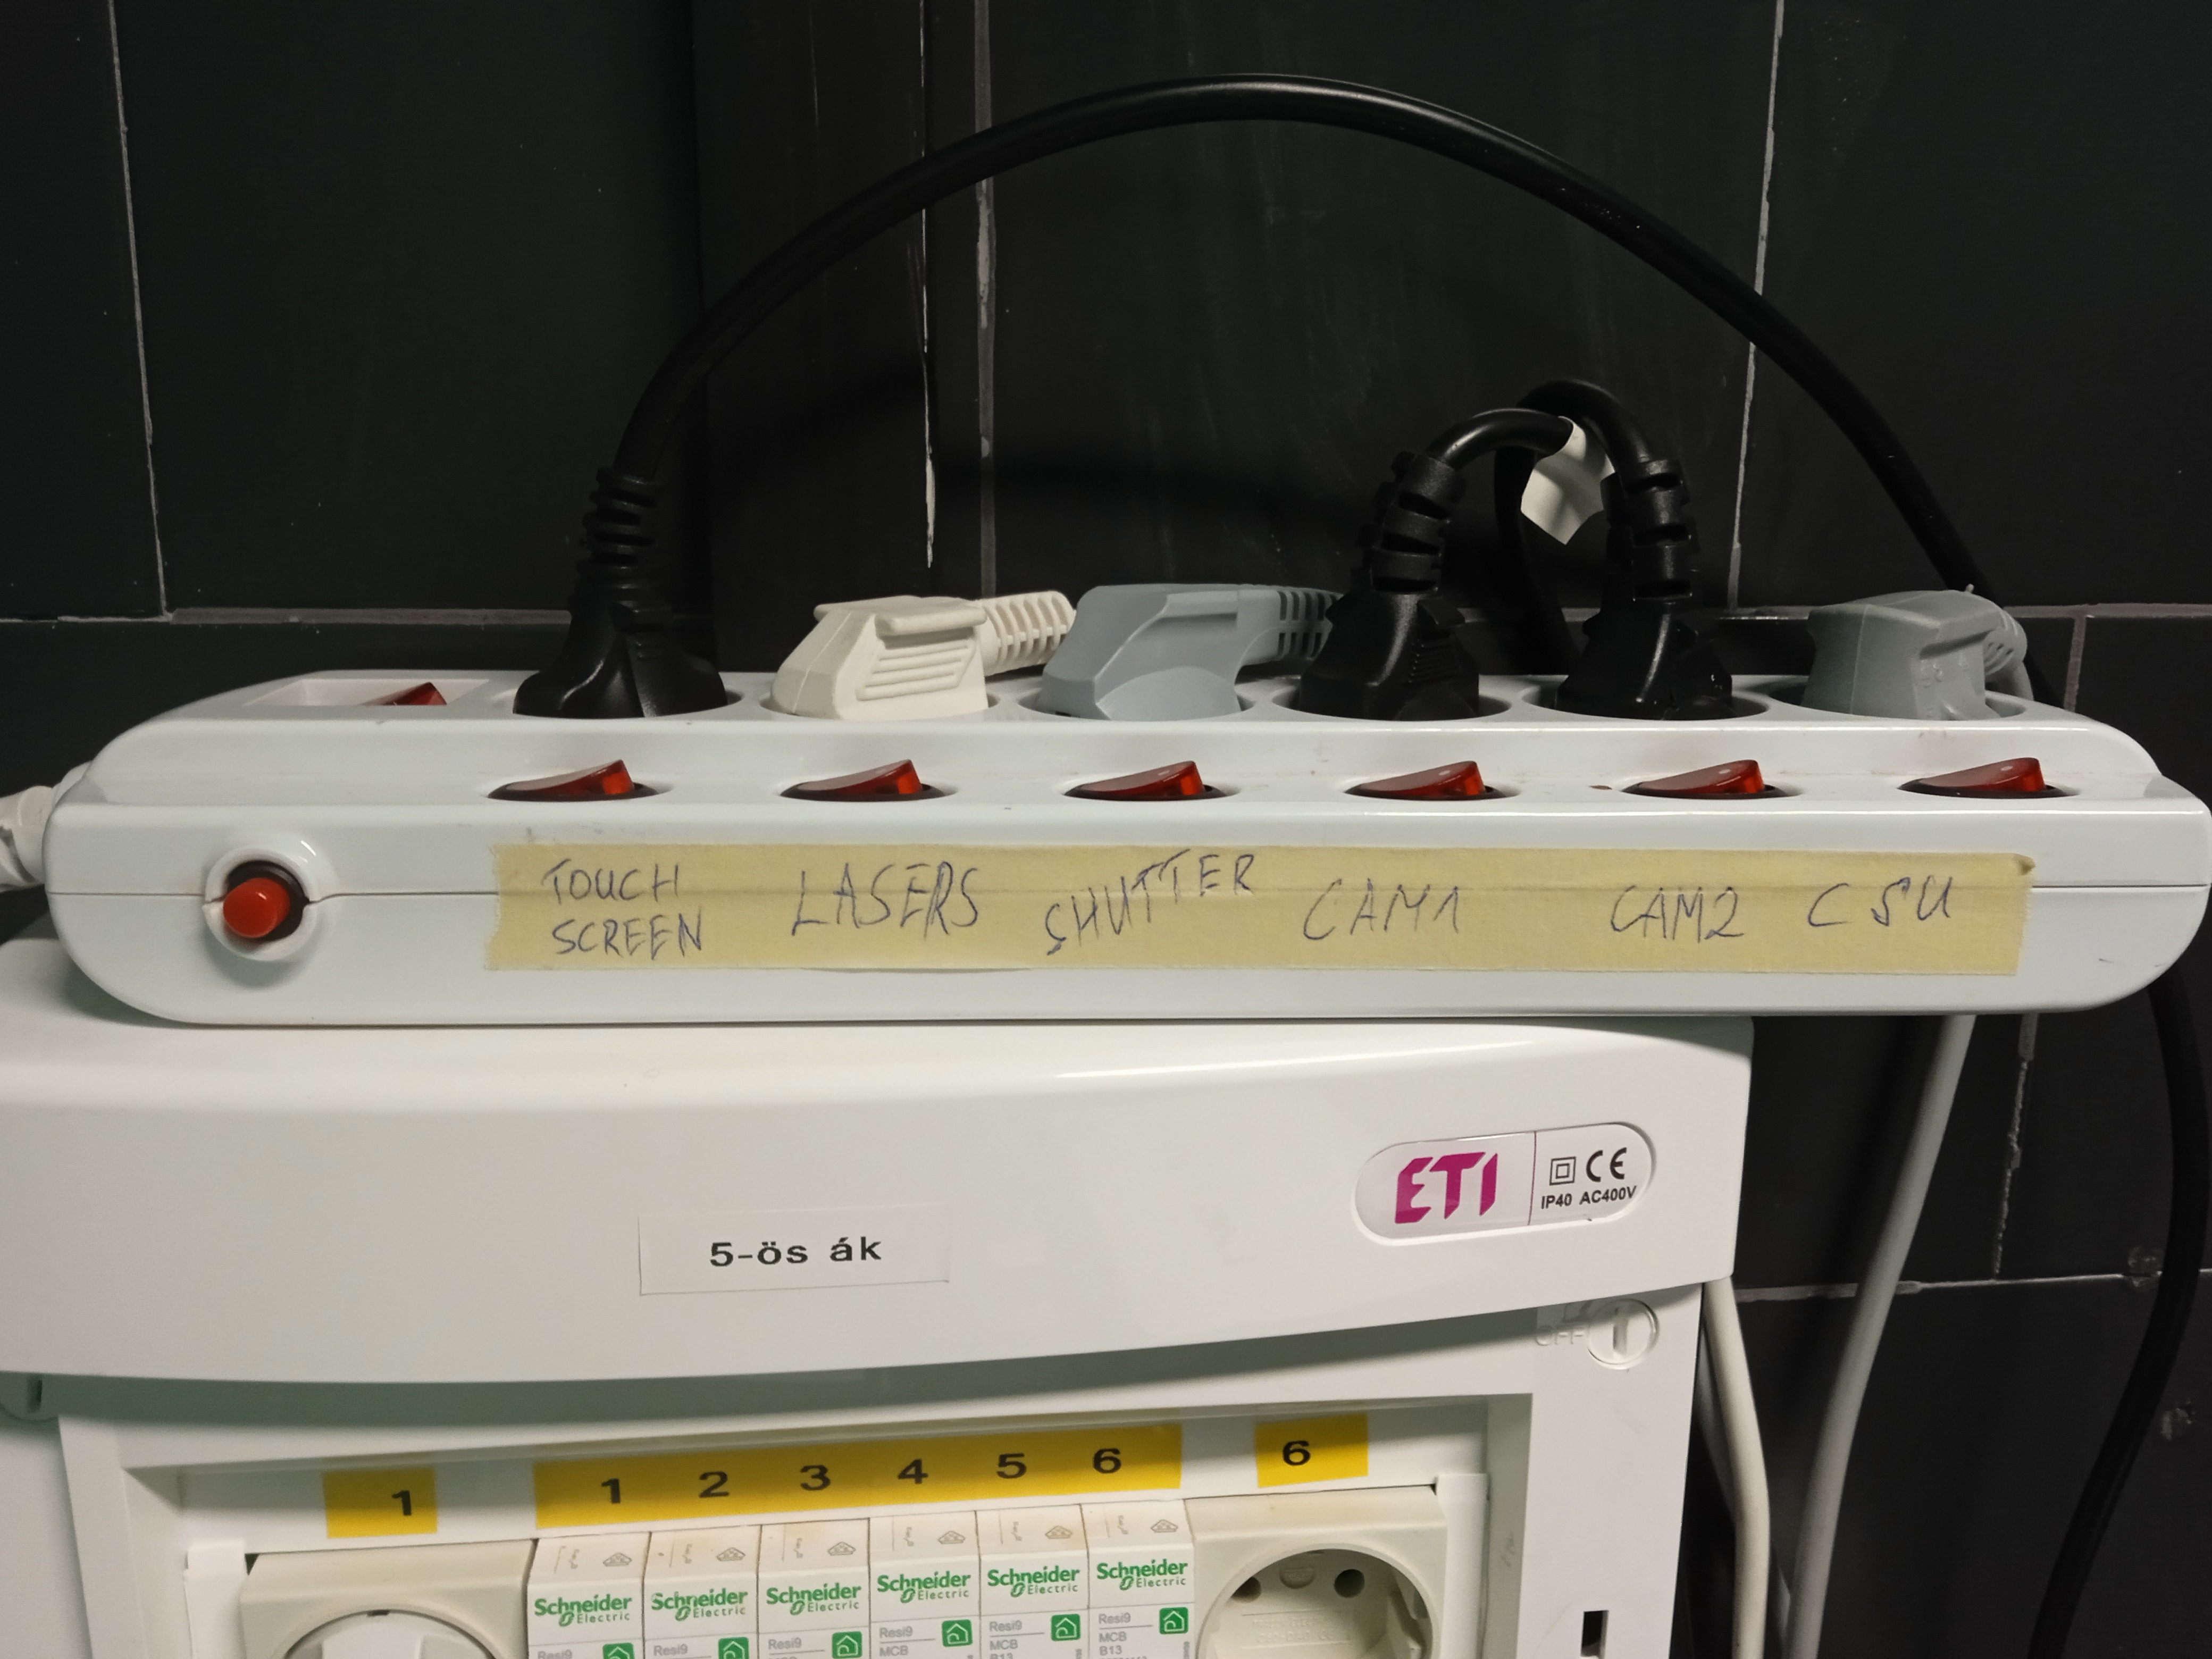
Important! Wait between the different units, til they are silent.
Red buttons in order (from left to right in the picture):
- Touch screen
- Lasers
- Shutter
- Cam1
- WAIT for beep (~3 sec)
- Cam2
- WAIT for beep (~3 sec)
- CSU
- WAIT (~40 sec)
- Toptica lasers: Turn on with the keys (red circles). Do not use the little switches.
- OBIS laser: Use the switch first (orange circle in the picture). WAIT for continuous green light (~70 sec). After that turn the key.
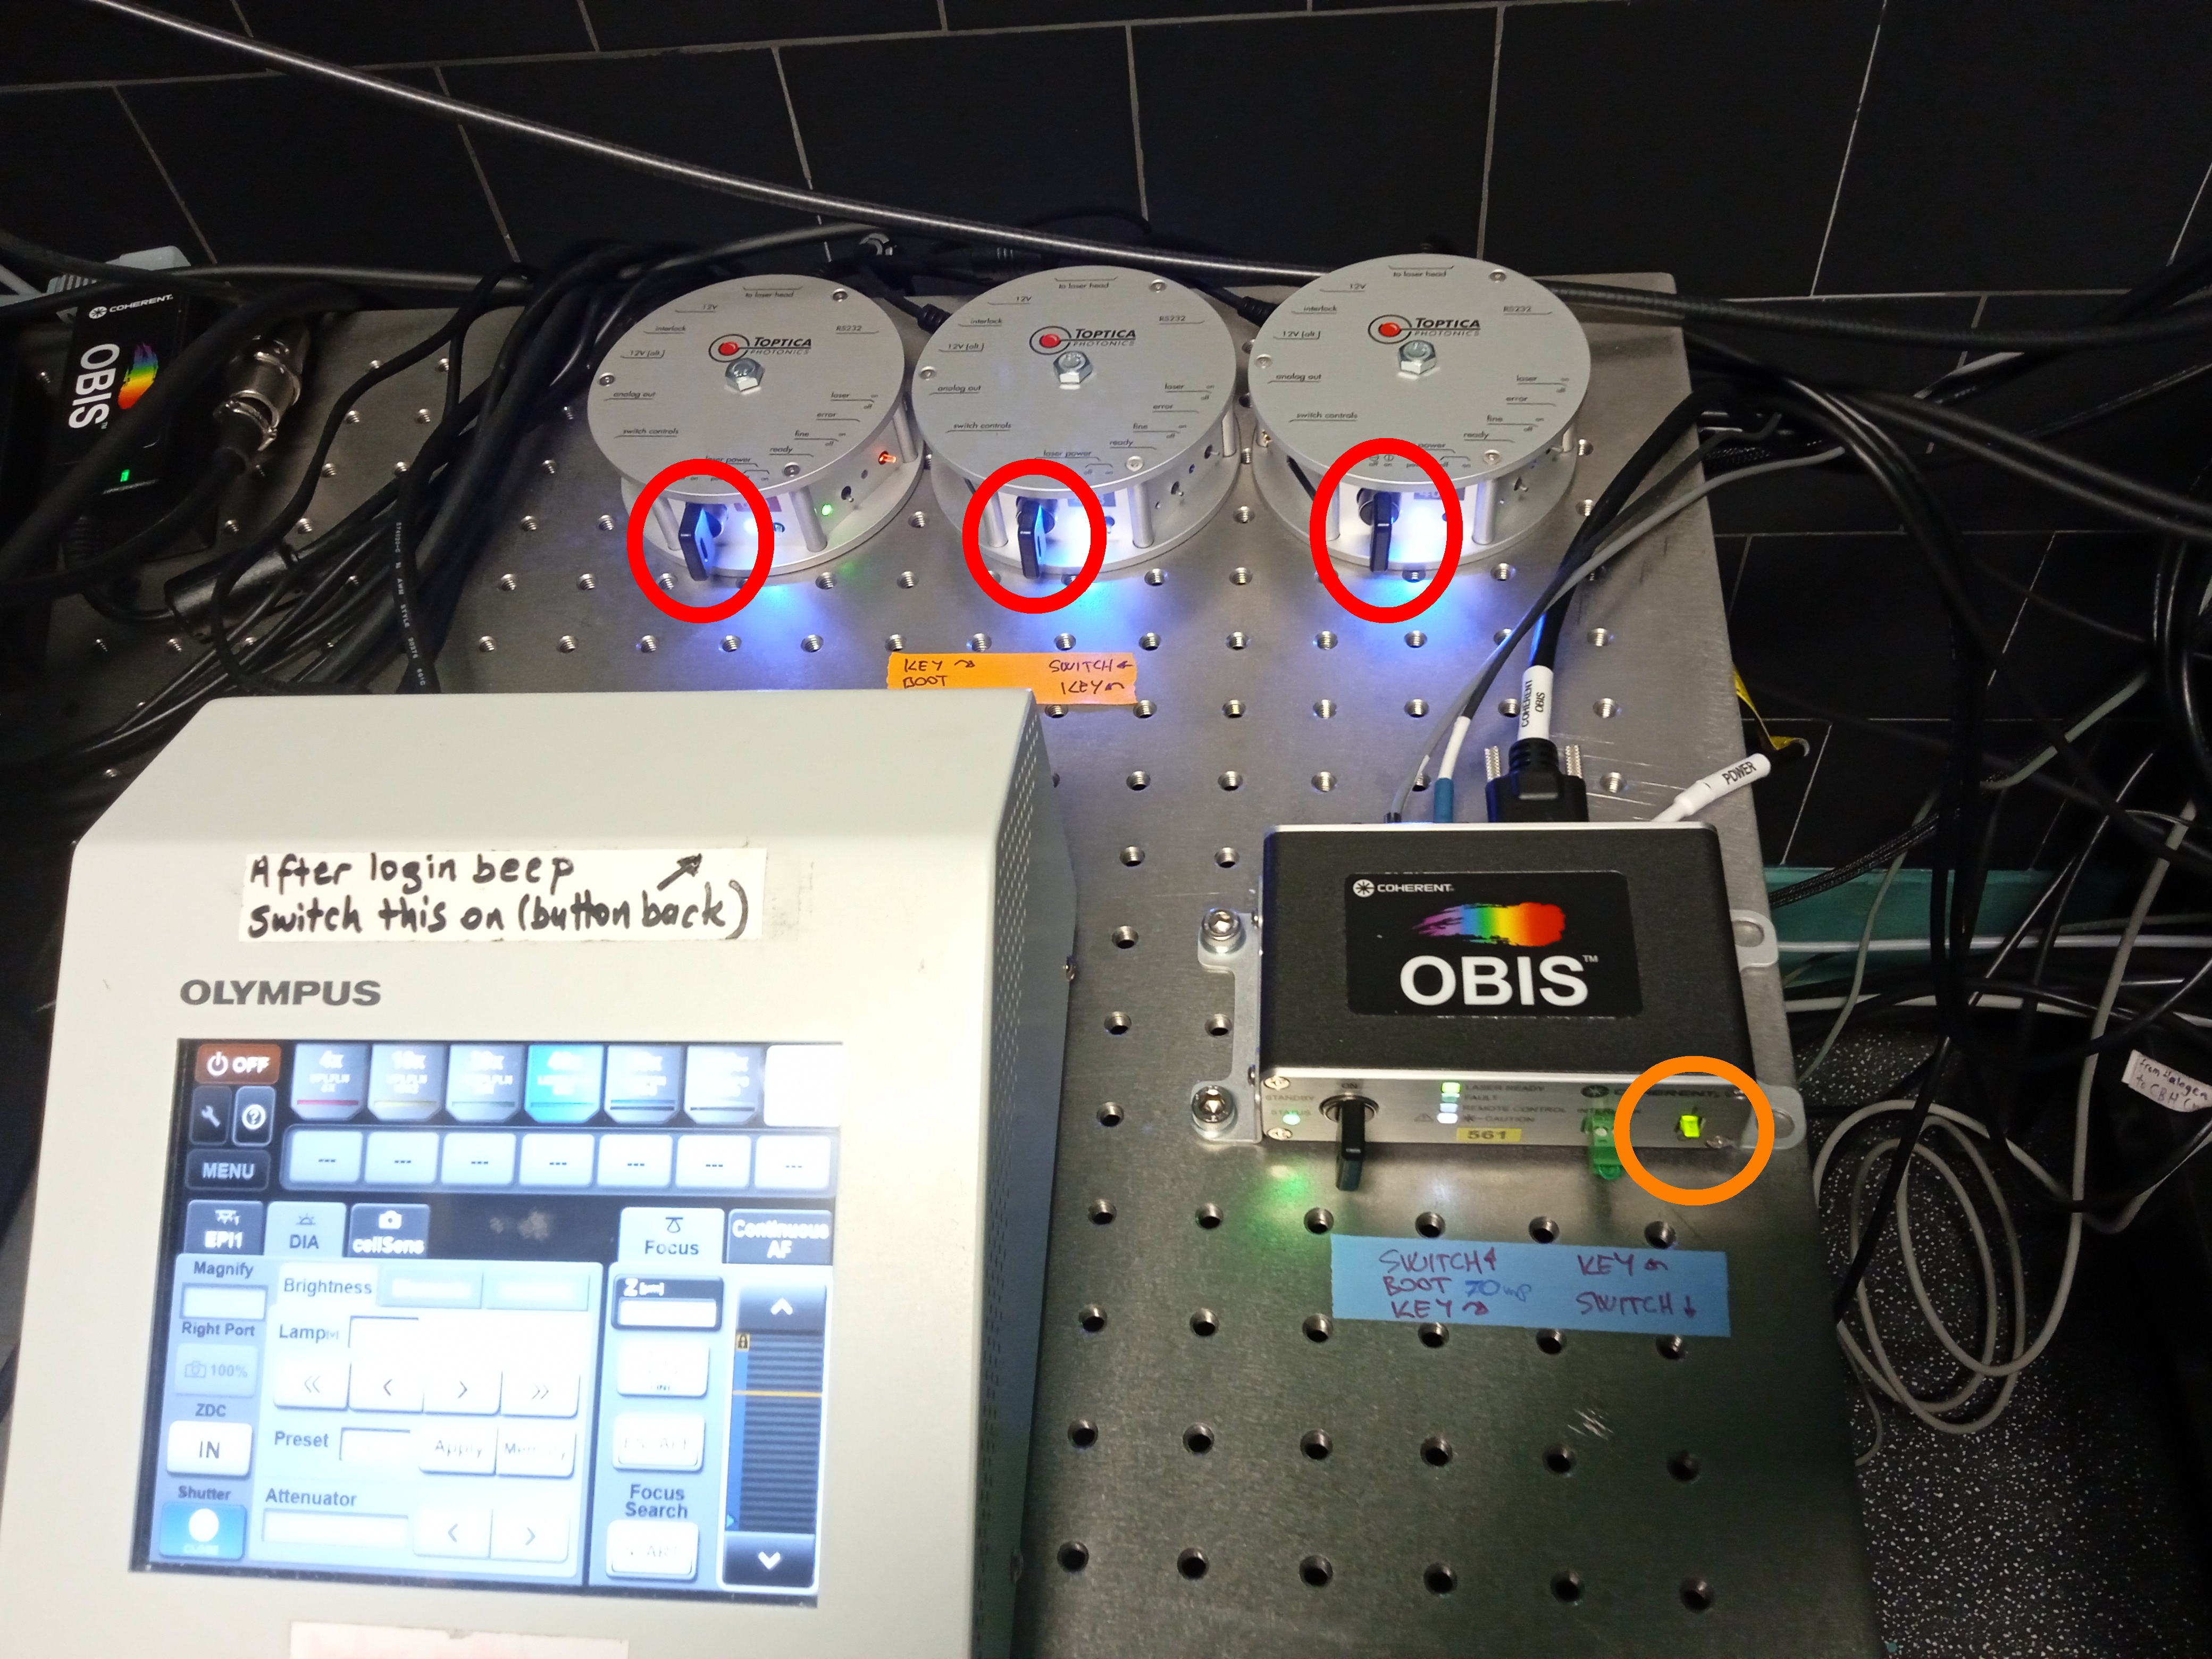
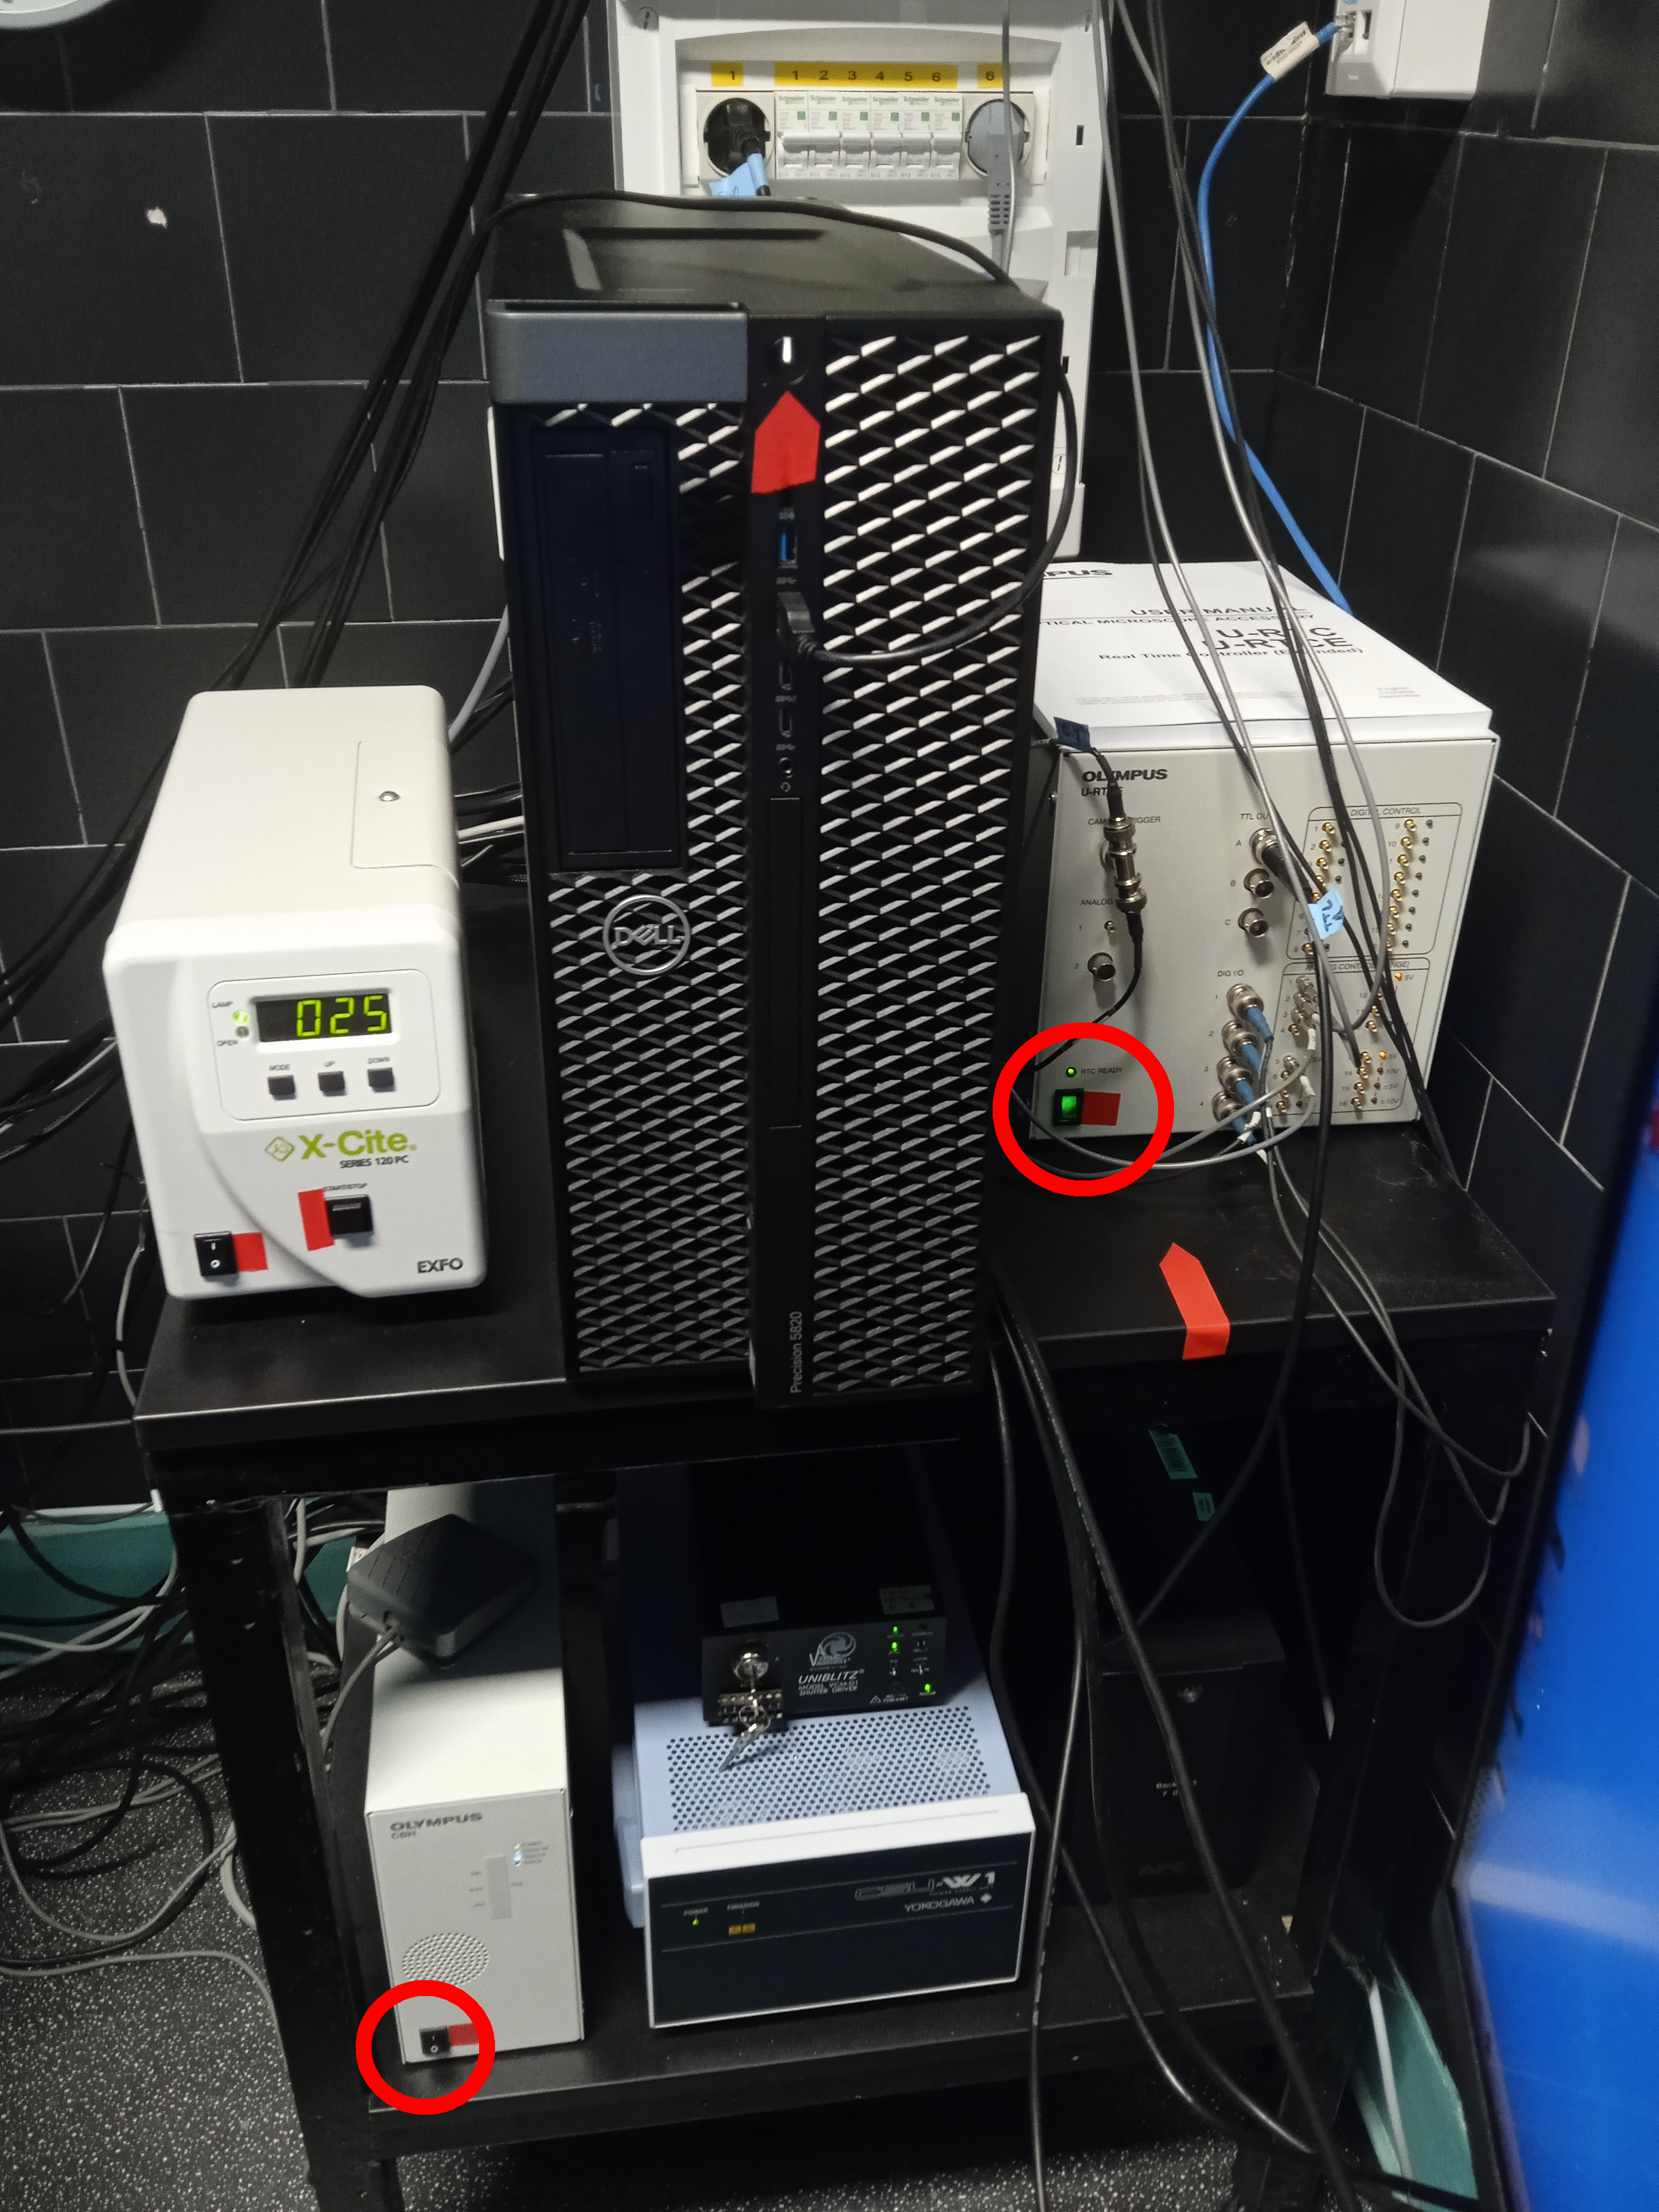
Switch them on (red circles in the picture).
Switch it ON, if you are planning to use the mercury lamp excitation (eyepiece or camera). This lamp is
independent of the laser excitation and confocal acquisition. It is very useful to make sure that the
staining is OK. (It happens: you see nothing, and it is just because of the bad laser/channel
settings - you can make sure, your sample is fine! :-))
It is dangerous to switch a mercury lamp off and on.
After it was switched ON, wait 100 sec and please check the first green light (with "LAMP" label). Solid light means OK. If the green signal led is blinking, please let us know. (It means, it is about to be exchanged.)
Open the shutter with the "START/STOP" button.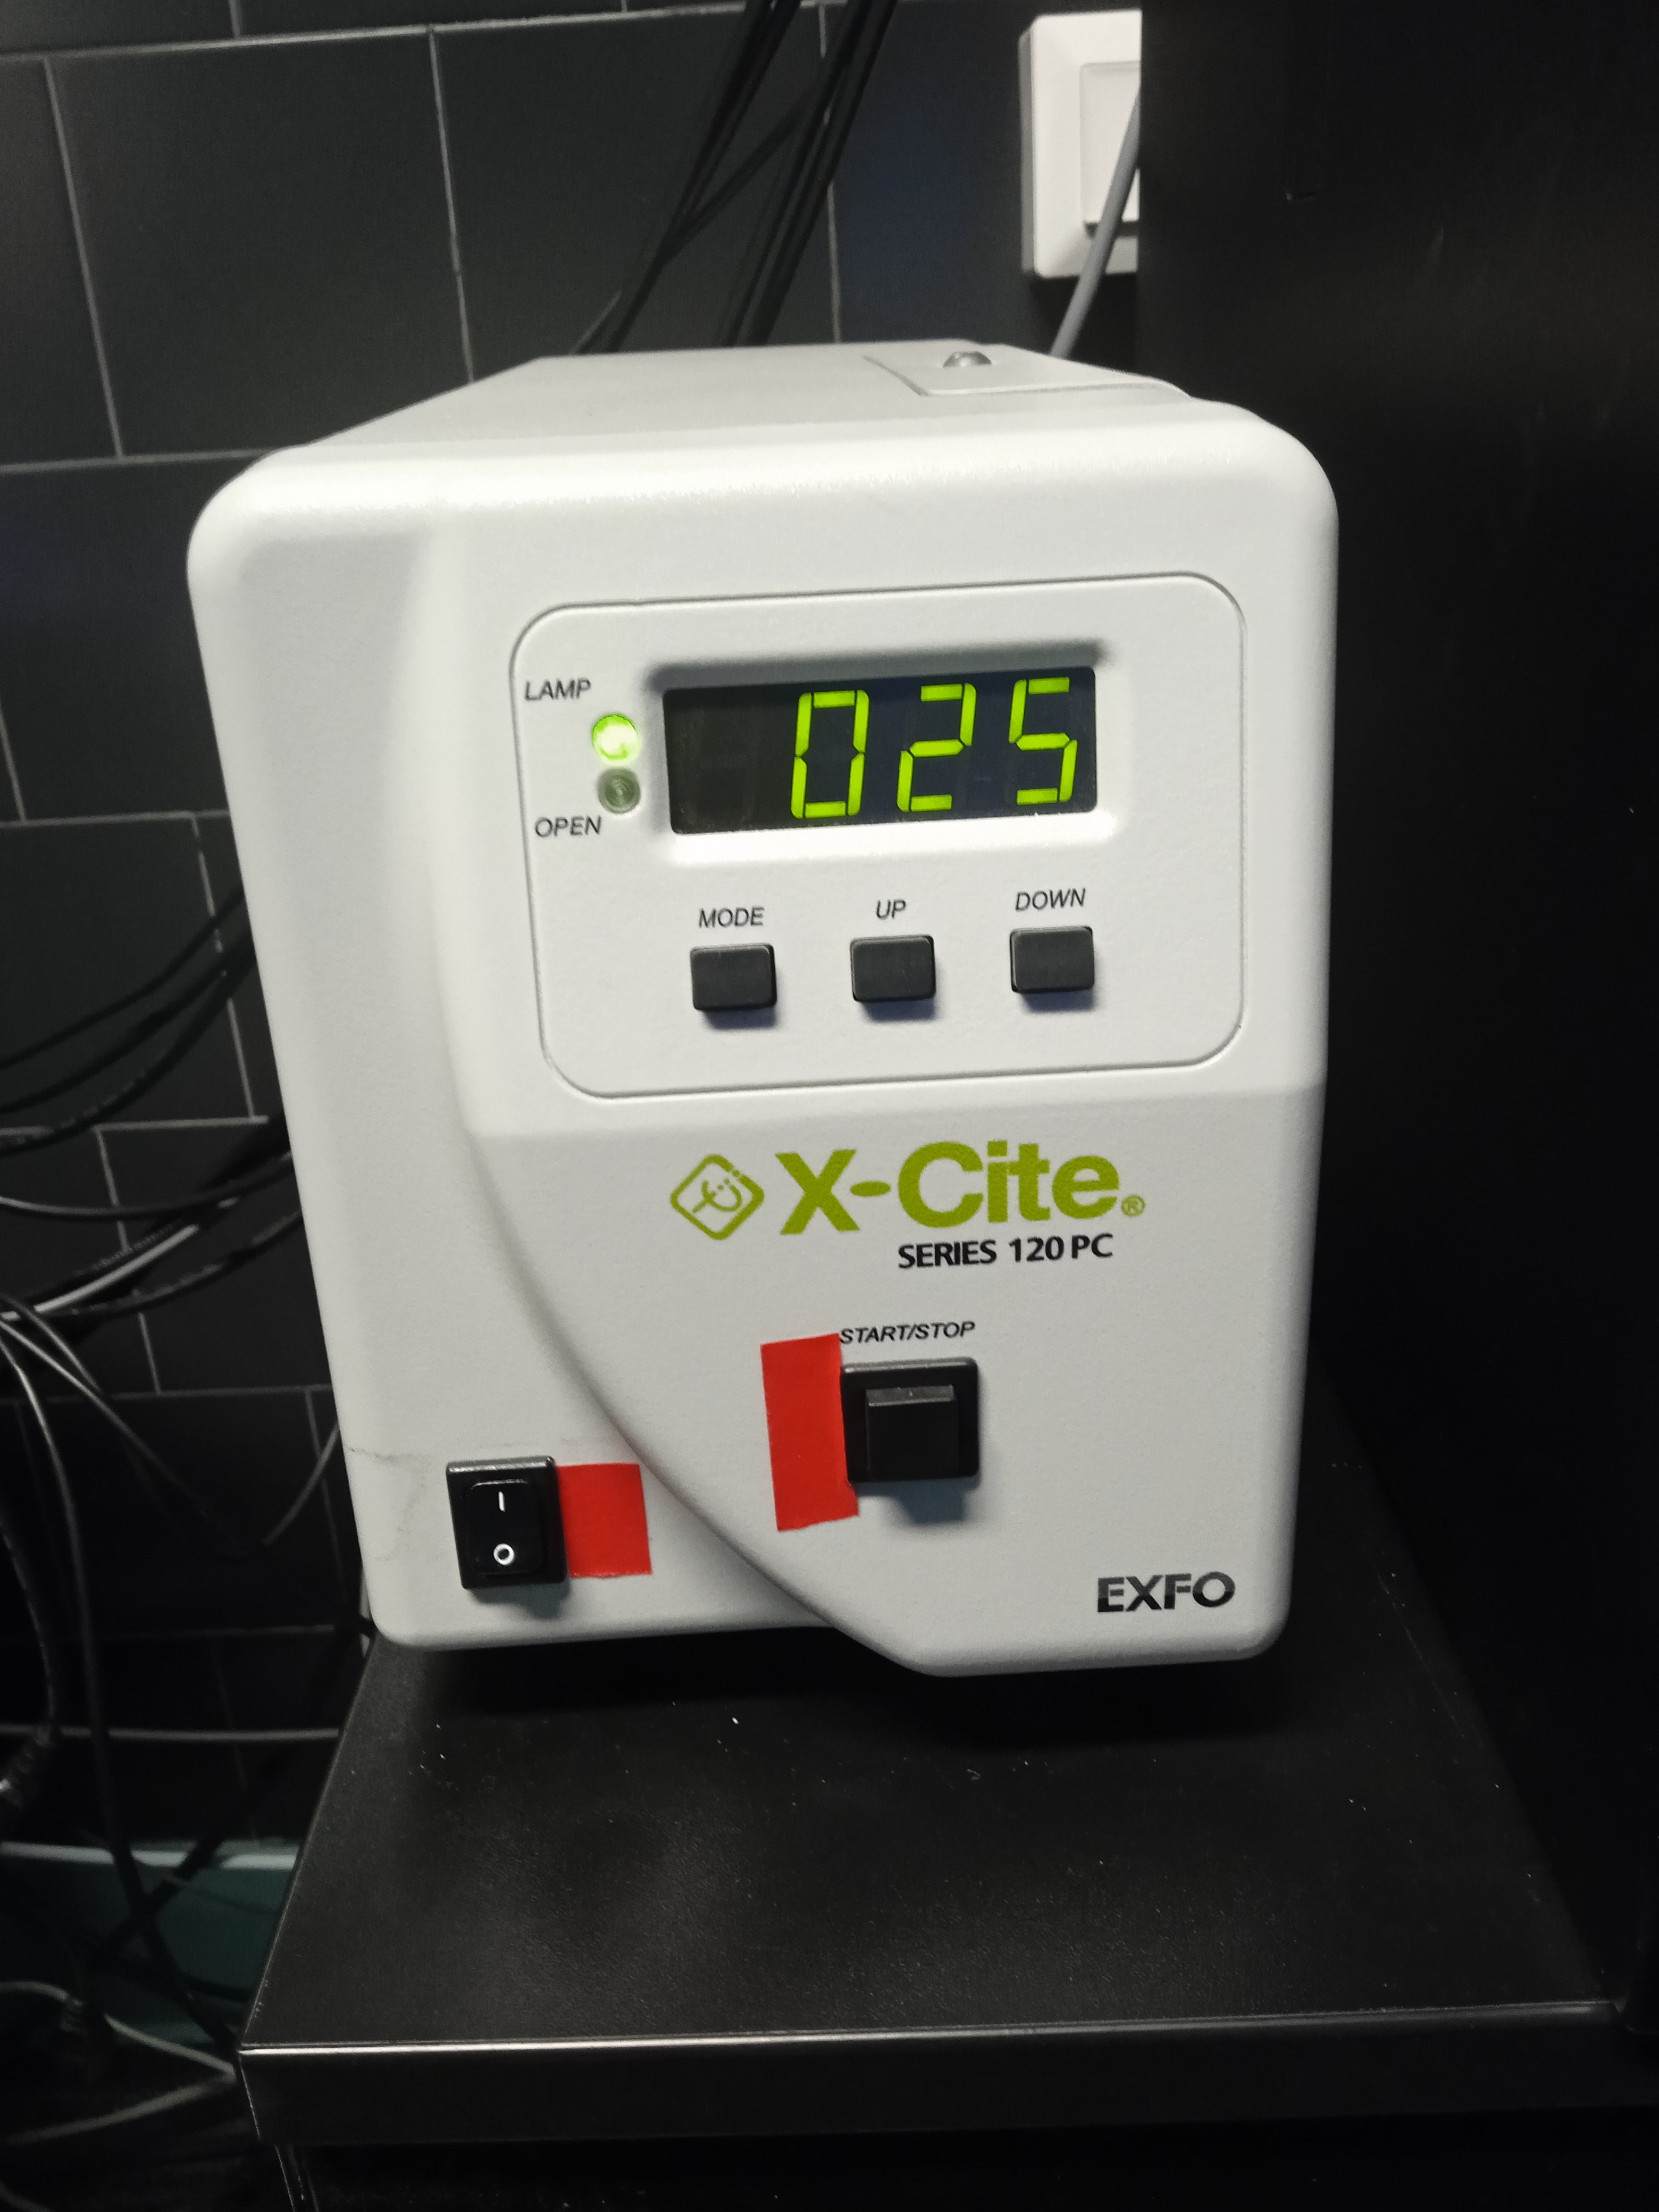
Important! Before switching on the lamp...
Please, make sure, the lamp is not warm - look at the
ASOK reservation system, check its temperature,
ask us... It is dangerous to switch a mercury lamp off and on.
After it was switched ON, wait 100 sec and please check the first green light (with "LAMP" label). Solid light means OK. If the green signal led is blinking, please let us know. (It means, it is about to be exchanged.)
Open the shutter with the "START/STOP" button.
Map your network drive (e.g. \\st1.brc\home or \\st18.brc\BOSSNAMEgr - "18" may be changed). Remember to write SAMDOM\ before your username. Please, don't store anything on this computer.
Login before using the microscope -
this will calculate your usage time.
Switch ON the touch panel (button on the back) and wait for the final blue "Start operation" screen. (~40 sec)
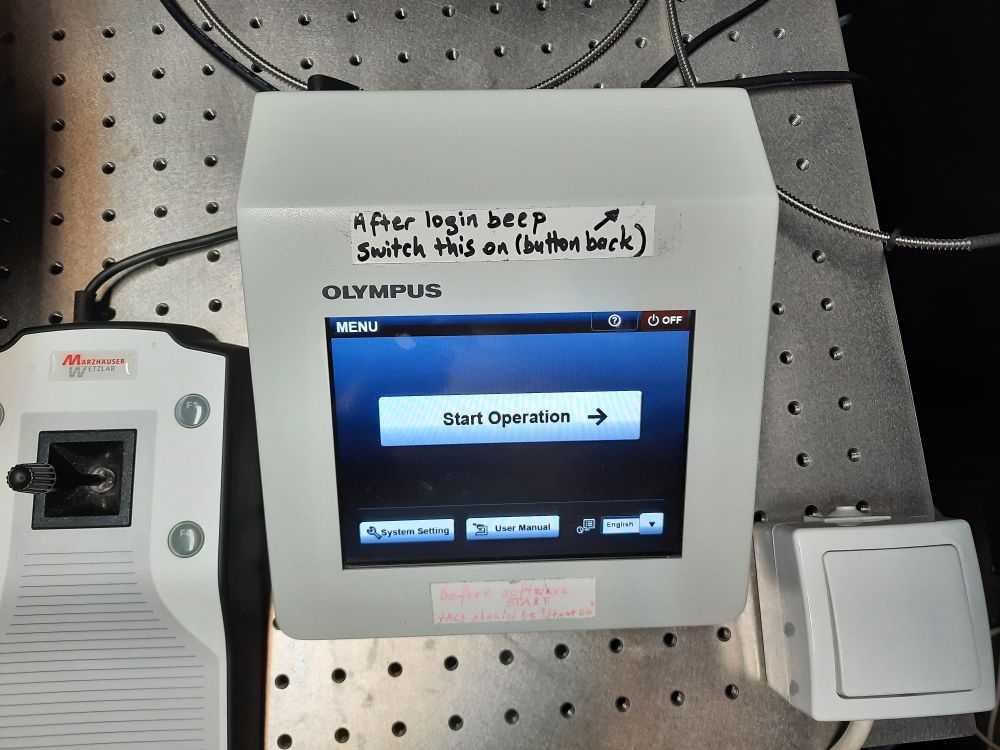
Start the cellSens software. (~40 sec)
You could be asked to perform the stage calibration process.
Worth checking the lasers before your work using any confocal observation method (e,g, 640Q).
Switch ON the touch panel (button on the back) and wait for the final blue "Start operation" screen. (~40 sec)
Possible problem: If it stays gray, please, report it.
Start the cellSens software. (~40 sec)
You could be asked to perform the stage calibration process.
Worth checking the lasers before your work using any confocal observation method (e,g, 640Q).
Image acquisition
Switch off the lights in the room, specially for non-confocal acquisitions.
Going through the following Observation methods helps you to make nice images :-)
Going through the following Observation methods helps you to make nice images :-)
- BFeye - find in transmission, 3V
- DAPIeye/GFPeye/... - refine the Z position / make sure, the staining is OK
- CloseEye - Switch off the light using method
- BFcam - no gain, 1 ms
- DAPIcam/GFPcam... - with gain, 100ms
- Confocal modes: 488T, 561T... - with gain, 700ms, 30%
Avoid touch panel - exception: DIA / Lamp voltage
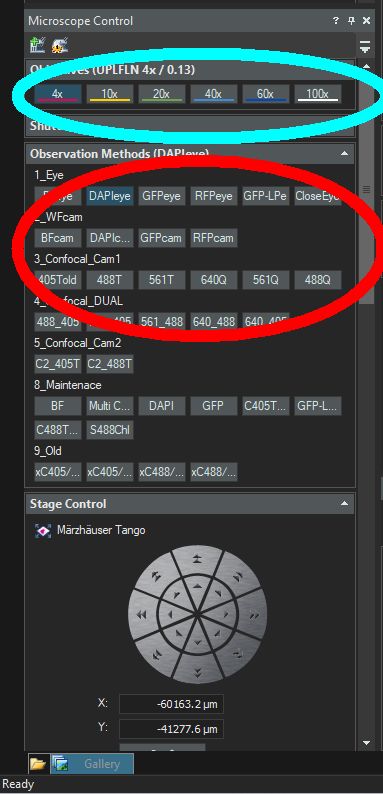
In the picture:
- in the blue circle: Objectives - Select them here, in order to inform the program about the scale. Never-ever switch objectives by hand on the revolver!
- in the red circle: you can change observation methods. The number in the name is the wavelength of your excitation laser
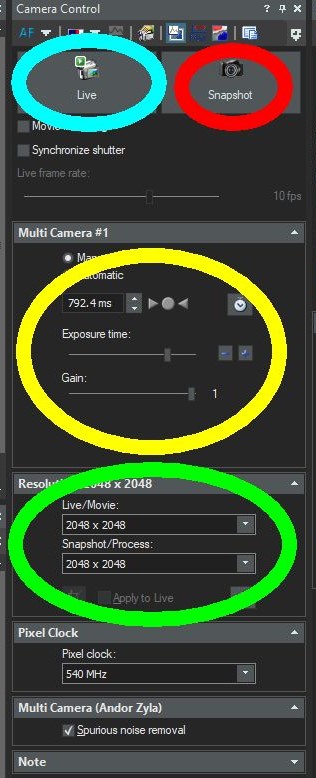
In the picture:
- in the blue circle: you can turn on/off the camera(s) for live image(s).
- in the red circle: you can take a picture.
- in the yellow circle: you can change the exposure time. And with the gain you can give more light to your image/record. (Exposure - photon collecting time -there's no sensitivity-speed-power triangle)
- in the green circle: you can change the resolution of your image. (Binning - collecting pixels from squares)
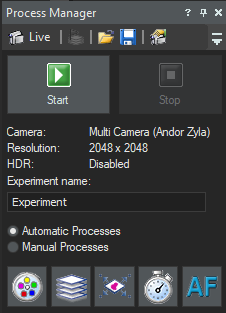
If you are on the automatic processes, you can do the next 5 kinds processes:
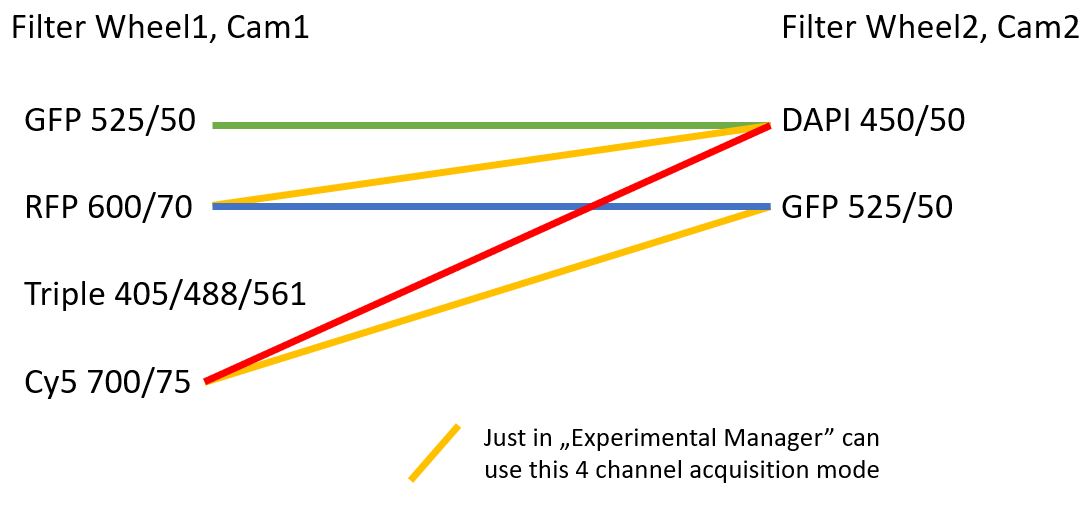
- Multichannel (first icon from the 5): Here you can add observation methods with different exposure time, different gain, and different Z-Offset. (If you want to use multichannel the laser with 405nm, you have to use the "C405Told" observation method.) You have to choose bigger expusre time than 1 ms.
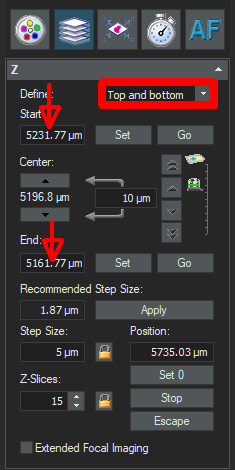
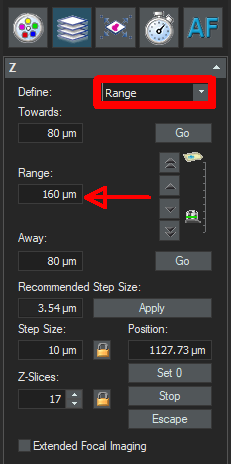
- Z-stack (second icon from the 5): Here you can do two types of z-stack:
- You choose the top and the bottom of your sample.
- You set the center of your z-stack and give a range in z for stacking.
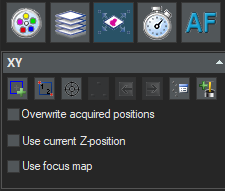
- Stage - XYZ positions (third icon from the 5): You can make large image with that.
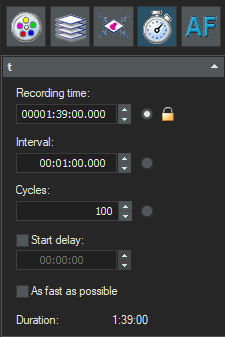
- Timelaps (fourth icon from the 5): you can set recording time, interval between two frames, number of frames, or/and time delay.
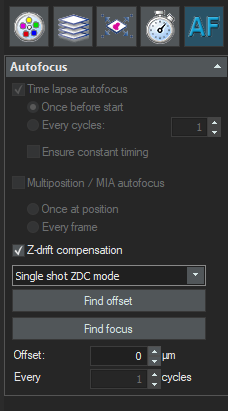
- Autofocusing(fifth icon from the 5): Here the software do the focusing automatically. It's working, but not the best.

You can't do multichannels on more than one dual camera methods in the same time.
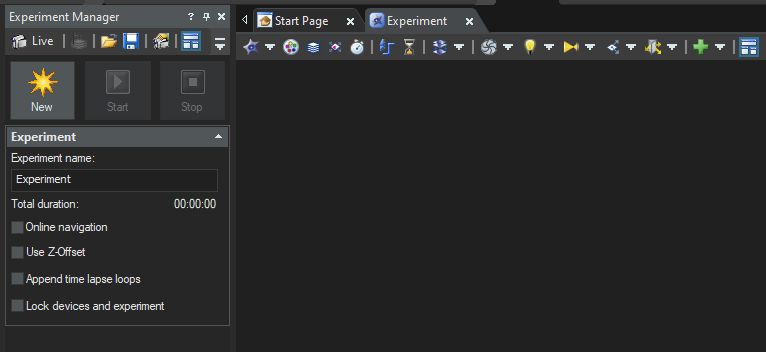
Bottom of the Process Manager click on the "Experiment Manager", and click on the "New" button. In the "experiment" window you can find everything what you find in the Process Manager. You can do time delays between processes, close and open shutters, and here you can do multichannel with dual camera as well.
Other functions

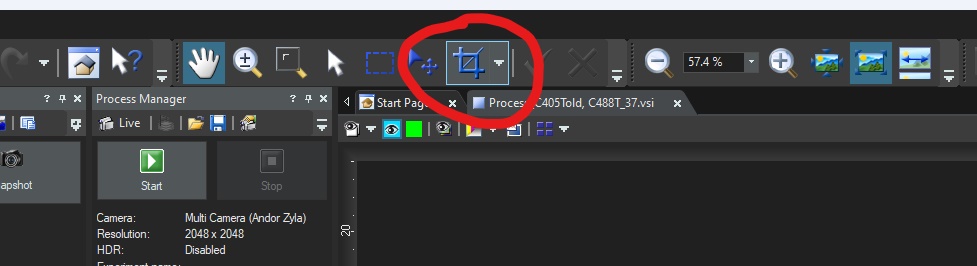
You can crop almost all the time from your pictures, but if you want to do it on a rotated pictrure, you have to do this way:
- Image>>geometry>>rotate
- Choose the perfect position and click on the "OK"
- Crop your your rotated picture (red circle)

If the pipe is in the "movie recording" checkbox, "snapshot" icon change to "movie" icon and you can take a video. Warning! When you start the movie, it will be started after ~30sec.
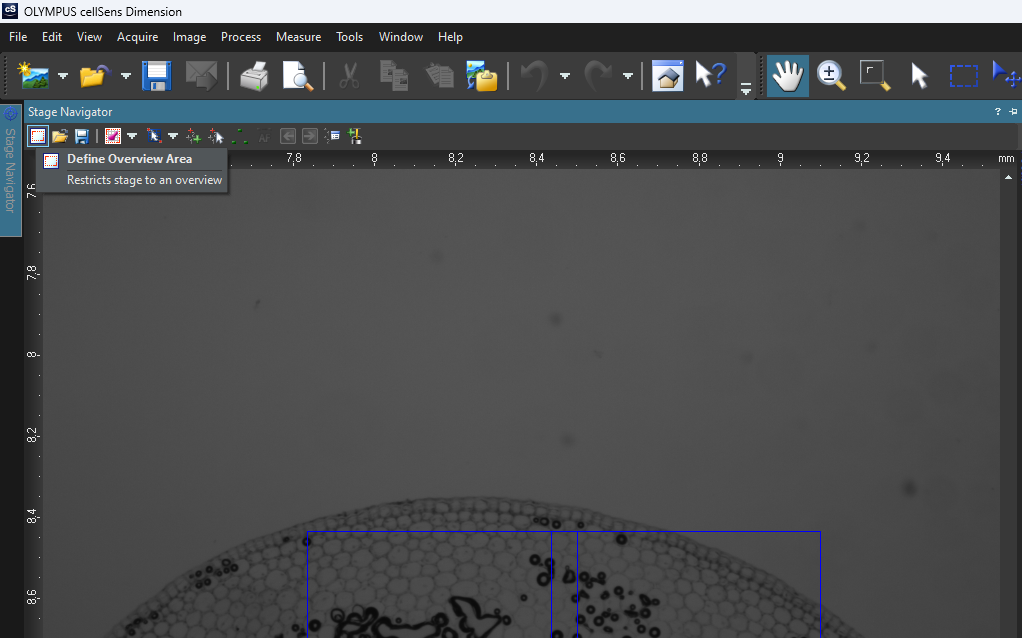
With the 1. icon (in the stage navigator window) you can define the overview area.
With the 4. icon you can scan the overview (with current channel or multichannel).
With the 5. icon you can chosse another area in your overview and you can take large image about that area.
In live you can click in the Stage Navigator map, and the stage move there.
Leaving/Switching off - check the reservation
- Save your work in VSI/TIFF format (if you choose TIFF, be careful, all multipage images were saved) - to your network drive
- Clean the objective (if you've used oil), lower it to the bottom and select the 10x
- Leave cellSense software (File/Exit)
- "Turn off" the microscope login webpage
- Disconnect your network drive
- Remove the foil from the ocular and don't forget your sample...
Switch off the fluorescent lamp
- Touch screen:
- OFF icon on the screen --> OLYMPUS logo
- Switch OFF the touch panel (button on the back)
- Switch off the lasers: Toptica lasers: turn off with the key OBIS laser: turn off with the key, after that use the switch
- Switch off all the small red buttons, but not the main switch.
- Switch off the RTC
- Switch off the CBH
- Cover the microscope
- Shut down Windows/PC.
- Turn off the light.
- If there is nobody around :-) lock the lab and take the key to the gate.